Published on: 2025-06-16
Updated on: 2025-06-16
The FX market is a fast-paced environment where institutional moves often dictate price action. One strategy used to uncover these hidden footprints is the Breaker Block strategy.
It is a key concept in Smart Money Concepts (SMC), offering traders insights into market structure, liquidity shifts, and price reversals. This guide will explain what breaker blocks are, how to identify them, and how to integrate them into your trading system in 2025.

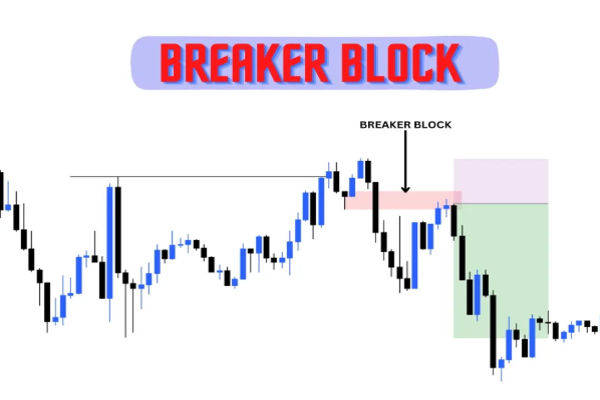
A breaker block is a price level formed from a failed order block, typically near a key swing high or low. Unlike traditional order blocks, which are zones where the price is expected to reverse due to institutional order flow, a breaker block signals a market shift where liquidity has been swept, and a new trend may begin.
Breaker blocks occur when:
Price breaks through a previous order block.
The broken level becomes a new support or resistance.
Smart money is likely using the breaker block to trap retail traders and shift momentum.
This strategy helps traders anticipate trend reversals or strong continuations by focusing on large market players rather than relying on lagging indicators.
Bullish vs Bearish Breaker Blocks
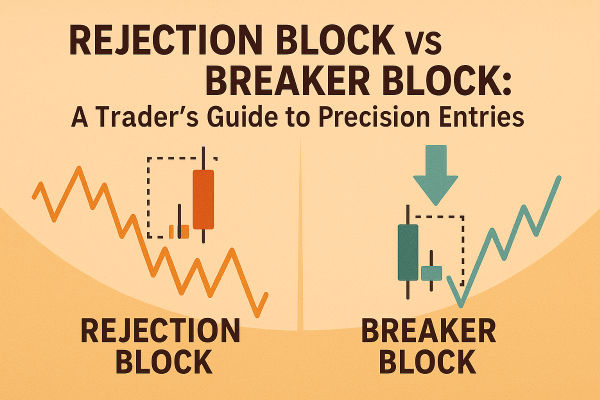
1) Bullish Breaker Block
It occurs when the price breaks above a bearish order block (typically from a prior downtrend), then retraces and respects the same zone as new support. It signals a shift from bearish to bullish sentiment.
Example: Price breaks above a swing high, retraces to the broken order block, and bounces higher.
2) Bearish Breaker Block
It occurs when the price breaks below a bullish order block, then retraces and rejects the level from below. It indicates bearish momentum and a reversal from an uptrend.
Example: The price breaks below a swing low, retraces upward to the broken block, and reverses downward.
| Feature | Breaker Block Strategy | Traditional Tools |
|---|---|---|
| Entry Points | Based on price structure | Based on indicators |
| Market Insight | Institutional order flow | Retail trader patterns |
| Confirmation Method | Liquidity + structure shifts | RSI, MACD, Moving Averages |
| Risk/Reward Potential | Higher | Moderate |
| Learning Curve | Steeper | Easier for beginners |
While traditional tools are easier to understand, breaker block strategies provide deeper insight into institutional trading behaviour.

To identify a valid breaker block, traders should watch for these key components:
Structure Break: Price breaks a major high or low, invalidating the previous order block.
Engulfing Candles: Strong bullish or bearish candles engulf recent price action, showing aggressive institutional participation.
Retest Zone: After the break, the price pulls back to the zone of the failed order block.
Volume Confirmation: Spikes in trading volume or volatility near the breaker block can validate the setup.
A high-probability breaker block setup typically aligns with a shift in market direction, particularly when confirmed by Smart Money Concepts such as liquidity sweeps or equal highs/lows.
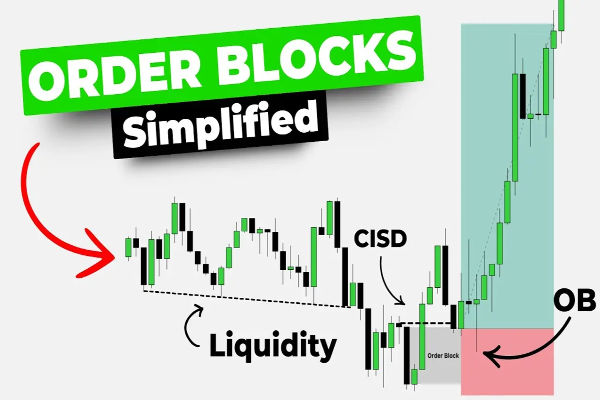
Breaker Block vs Order Block
While both order blocks and breaker blocks are areas of institutional activity, they serve different purposes and require distinct interpretations.
An order block is:
A consolidation zone where institutions accumulate or distribute positions.
Typically, this leads to a reversal or strong move.
A breaker block is:
A failed order block that has been violated by price.
Price returns to retest it from the opposite direction.
Signals a significant change in market structure.
Understanding this difference is crucial for executing precision entries and setting realistic stop-loss and take-profit levels.

Step 1: Identify the Trend and Market Structure
Start by determining the overall trend—bullish or bearish. Use market structure to confirm if the market is making higher highs and higher lows or lower highs and lower lows.
Wait for a CHOCH (Change of Character) to signal a potential reversal.
Step 2: Locate the Order Block and Wait for Break
Mark a recent order block near a swing high/low. Monitor the price for a break beyond this level. When the price breaks through, it confirms the invalidation of that order block. It becomes your potential breaker block zone.
Step 3: Wait for the Retest
Patience is key. Wait for the price to return to the breaker block zone. It is your potential entry point. Use smaller timeframes to refine your entry within the zone.
The price may wick into the zone before continuing the new trend direction.
Step 4: Enter the Trade
Once the price shows a reaction at the breaker block (e.g., rejection wicks, bullish and bearish engulfing candle), enter the trade.
Place a stop-loss just beyond the breaker block, ensuring your risk is controlled.
Step 5: Set Take-Profit Targets
Target the next major swing, high and low, imbalance zones, or liquidity areas. Use multiple take-profit levels if trading with multiple positions.
Always ensure your risk-to-reward ratio is at least 1:2 or better.
Real World Example
Setup:
Market: EUR/USD
Timeframe: 1H
Structure: Downtrend with a bullish order block near a support level
Price Action:
Price breaks below the bullish order block and takes out a swing low
Price retraces to the broken order block (now a bearish breaker block)
A bearish engulfing candle forms at the breaker block
Trade:
Entry: At the breaker block
Stop Loss: Above the block
Take Profit: Next demand zone or major swing low
Outcome: Price continues downward for a 3R return
| Benefits | Risks |
|---|---|
| Helps identify high-probability entry zones | Requires experience to interpret correctly |
| Reveals institutional price levels | May produce false signals in low-volume markets |
| Offers tight stop-loss with high reward setups | Entries can be mistimed without confluence |
| Works well with Smart Money Concepts (SMC) | Subjective – different traders may mark blocks differently |
| Effective across multiple markets (forex, crypto, etc.) | Not ideal for choppy or sideways markets |
| Enhances understanding of price structure | May underperform without proper market context |
In conclusion, breaker blocks are one of the most powerful tools in the Smart Money Concepts toolbox. They highlight institutional price levels, reveal key market reversals, and provide precision entries for disciplined traders.
Mastery of breaker blocks doesn’t come overnight. It requires chart time, backtesting, and a patient mindset. But for those willing to put in the effort, breaker blocks can be a game-changer in navigating the forex market with clarity and confidence.
Disclaimer: This material is for general information purposes only and is not intended as (and should not be considered to be) financial, investment or other advice on which reliance should be placed. No opinion given in the material constitutes a recommendation by EBC or the author that any particular investment, security, transaction or investment strategy is suitable for any specific person.