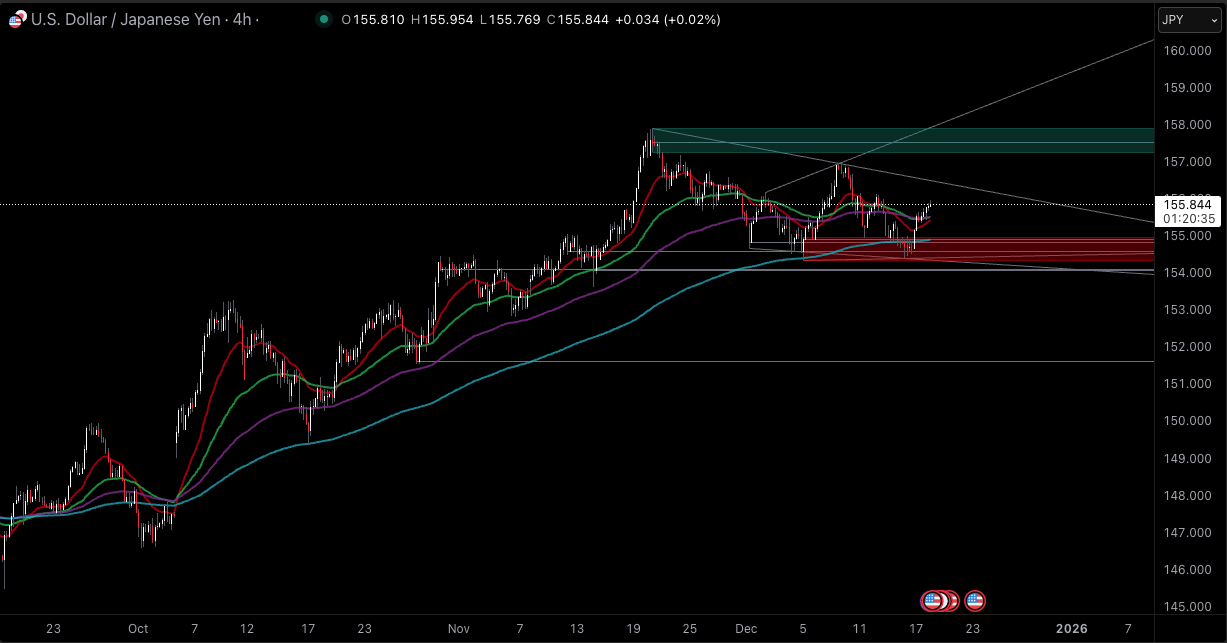
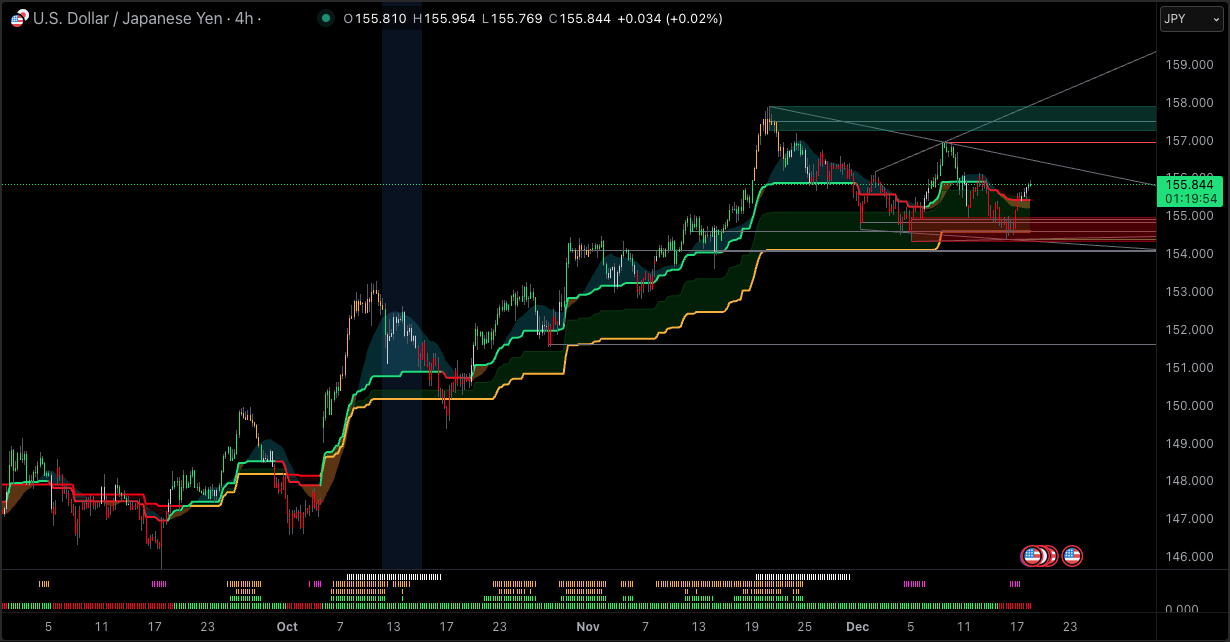
USDJPY is trading in a tight, elevated range on the H4 chart, with price holding near the upper half of the recent weekly band. The tape is bullish in structure, but it is also compressed, which is exactly the kind of setup that can snap hard when a policy headline hits.
The one level that matters most right now is the 155.80 to 156.00 decision zone. It sits where short-term momentum traders tend to defend trend continuation, while event-driven sellers lean into any failed break, especially into central bank risk.
The next volatility catalyst is the Bank of Japan policy decision window on December 19, 2025 (0330 to 0500 GMT), where markets are widely positioned for a 25 bp hike to 0.75% from 0.50%, followed by a briefing scheduled at 0630 GMT.
On the USD side, policy still sits materially higher: the federal funds target range was reduced to 3.50% to 3.75% on December 10, 2025, keeping the rate differential supportive for USDJPY on pullbacks, even as the market debates how quickly Japan can normalize.
Key Levels: Pivot Zone Into The BoJ Decision
| Level |
Price |
Why It Matters (H4) |
| Resistance 2 |
156.95 |
Prior swing supply and failed extension zone. A clean H4 hold above opens a squeeze path toward the 52-week high area. |
| Resistance 1 |
156.07 |
Nearby pivot-derived ceiling. A break and hold shifts flows from “sell rallies” to “buy breakouts.” |
| Pivot Zone |
155.80 |
The decision-point. Central pivot marker and a liquidity magnet where flows tend to pool ahead of event risk. |
| Support 1 |
155.62 |
Confluence of pivot support and major moving-average gravity. An H4 close below raises odds of deeper mean reversion. |
| Support 2 |
155.53 |
Lower pivot support. Post-decision volatility makes this the first “must-reclaim” level for bulls. |

Technical Dashboard For H4 Timeframe
The near-term bias is still constructive, but it is getting crowded. Momentum is bullish, while overbought signals warn that a hawkish surprise (or even a “hawkish hike”) can still trigger a flush before the trend resumes.
| Metric |
Current Value |
Signal |
Practical Read |
| Price (Close) |
155.86 |
Bullish |
Above key averages and pivot zone, but close to rejection territory. |
| RSI (14) |
65.659 |
Bullish |
Strong momentum without blow-off conditions; risk of rollover toward midline if BoJ rhetoric turns hawkish. |
| MACD (12,26,9) |
0.17 |
Bullish |
Trend-followers retain the edge; watch for flattening post-decision as an early warning. |
| ADX (14) |
32.078 |
Trending |
Trend conditions are present; fewer low-probability shorts unless a level breaks and holds. |
| ATR (14) |
0.1329 |
Neutral |
Baseline volatility is normal, but policy events can easily expand ranges. |
| Williams %R (14) |
-13.043 |
Overbought |
Price is stretched; bulls want shallow pullbacks, bears need support breaks to avoid squeezes. |
| CCI (14) |
127.774 |
Overbought |
Confirms strong upside impulse but warns against late-stage chasing into a catalyst. |
| MA20 |
155.62 |
Bullish |
Dynamic support; sustained H4 loss signals a posture change. |
| MA50 |
155.20 |
Bullish |
Line in the sand for deeper reset; stabilization here often attracts dip-buyers. |
| MA100 |
155.32 |
Bullish |
Confirms underlying bid; failure increases odds of multi-session correction. |
| MA200 |
155.66 |
Bullish |
Trading marginally above it, making this a pivot battlefield during headline spikes. |
Momentum And Structure: Bull Trend With Event-Risk Fragility
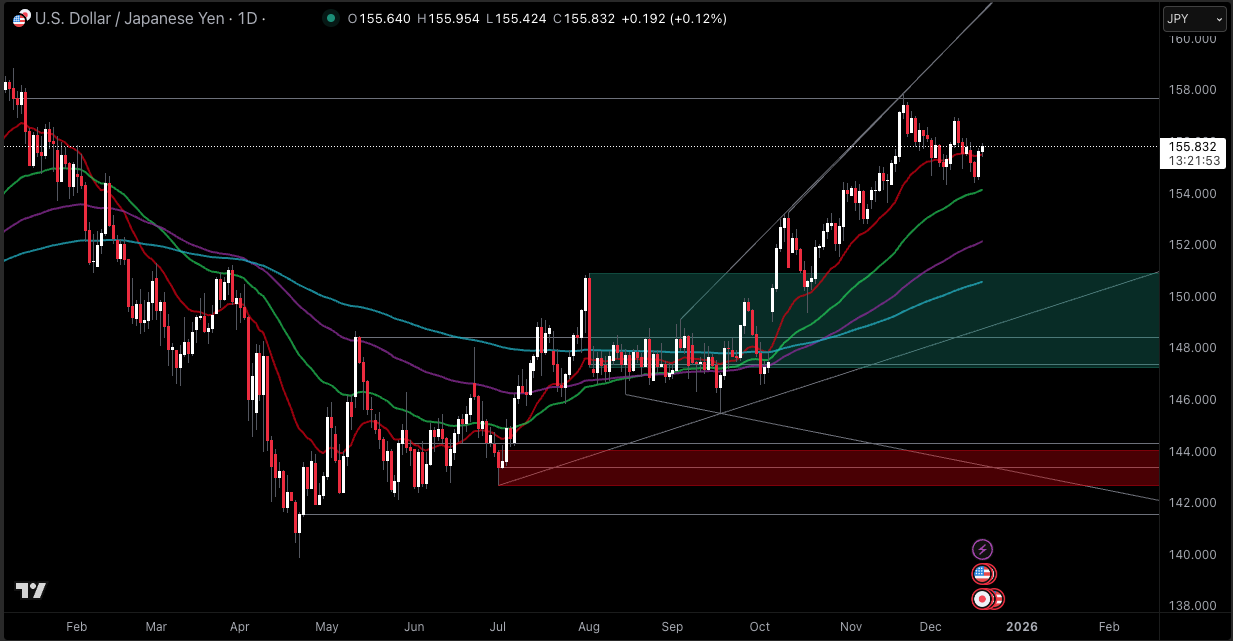
Multi-timeframe readings show the “engine” is still running intraday, while the higher-level posture is less convincing. Shorter timeframes are flagged as strong-bid, but the daily tone is closer to neutral, which is classic “trend late-cycle” behavior.

Structurally, the market is trading like a coiled spring: price is elevated, but the distance to meaningful support is not large. That combination tends to create sharp, fast stop-runs around policy headlines, followed by a more honest directional move once liquidity clears.
Execution constraint for this setup: avoid treating the first post-decision spike as “the move.” The more consistent edge comes from letting H4 closes confirm acceptance above resistance or rejection back below the pivot zone.
Lower Timeframe Read: Where Trades Fail Fast
If USDJPY holds above 155.80 into the decision, the tape is likely to remain buy-the-dip on shallow pullbacks, with quick mean reversion to the pivot. That is where longs can define risk tightly, but also where they get punished first if the BoJ surprises hawkishly.
If the pair starts printing lower highs below 156.07, that is typically the first tell that the market is front-running a “sell the fact” reaction. In that case, the downside trade improves if 155.62 and 155.53 stop holding on closing bases, not just wicks.
| Scenario |
Trigger |
Invalidation |
Target 1 |
Target 2 |
| Base Case |
Hold above 155.80 and reclaim 156.07 after wicks |
H4 close below 155.62
|
156.07 |
156.95 |
| Bull Case |
H4 acceptance above 156.07 with follow-through |
Rejection back below 155.80
|
156.95 |
158.50 |
| Bear Case |
Post-decision rejection under 156.07, then H4 close below 155.62
|
H4 close back above 156.07
|
155.53 |
155.20 |
Scenarios: Levels, Triggers, Invalidation, Targets
| Scenario |
Trigger |
Invalidation |
Target 1 |
Target 2 |
| Base Case |
Hold above 155.80 and reclaim 156.07 after wicks |
H4 close below 155.62
|
156.07 |
156.95 |
| Bull Case |
H4 acceptance above 156.07 with follow-through |
Rejection back below 155.80
|
156.95 |
158.50 |
| Bear Case |
Post-decision rejection under 156.07, then H4 close below 155.62
|
H4 close back above 156.07
|
155.53 |
155.20 |

Risk Notes: BoJ Timing, Rate Gap, Intervention Optics
The primary risk window is the BoJ decision due December 19 (0330 to 0500 GMT) and subsequent briefing. Expect headline slippage, sudden spread widening, and two-way whipsaws even if the eventual direction is clean.
Japan’s market backdrop is already tense, with reports highlighting long-end yield pressure and renewed rate-hike expectations. That matters because USDJPY can swing on yields even before FX narratives catch up. Also keep the “intervention optics” in mind: multiple market commentaries continue to cluster around 160 per USD as a sensitivity zone.
Frequently Asked Questions (FAQ)
1. Is USDJPY bullish or bearish right now?
Near-term momentum is bullish, but stretched. Overbought oscillators suggest the trend is vulnerable to a sharp pullback around the BoJ catalyst.
2. Why can USDJPY fall even if the BoJ hikes as expected?
When a hike is widely priced, the first reaction can be “sell the fact,” especially if guidance is less hawkish than positioning implies.
3. What matters more for direction: the hike or the guidance?
Guidance. A hike to 0.75% is broadly anticipated; the market will trade the implied path for follow-up hikes and the tone around inflation and wages.
4. How does the Fed backdrop still support USDJPY?
Even after the December cut, the policy range at 3.50% to 3.75% keeps the rate differential substantial, which can limit downside follow-through unless Japan signals a faster normalization path.
5. Where is the “line in the sand” for bears?
A sustained break and H4 close below 155.62 shifts control toward a deeper reset, with 155.53 and then the mid-155s as the next battlefields.
6. What is the cleanest way to manage risk around the decision?
Use levels and closes, not headlines. Let the first spike clear, then trade acceptance or rejection relative to 155.80 and 156.07 with defined invalidation.
7. Why is BoJ risk so important for USDJPY?
The decision and communication can reprice the yield differential quickly, which is the core driver of USDJPY trends.
Conclusion
USDJPY is entering the BoJ decision with bullish short-term structure, but momentum readings are stretched and vulnerable to a fast shakeout. The technical map is clean: 155.80 is the pivot, 156.07 is the breakout filter, and 155.62 to 155.53 is the first support shelf that must hold to keep dips buyable.
Into a likely 0.75% BoJ hike, the higher-probability play is patience: trade what price accepts after the decision window, not what the first headline prints. If 156.07 holds as support, upside extension risk grows. If 155.62 breaks on a closing basis, the market is signaling a deeper reset before the next directional leg.
Disclaimer: This material is for general information purposes only and is not intended as (and should not be considered to be) financial, investment or other advice on which reliance should be placed. No opinion given in the material constitutes a recommendation by EBC or the author that any particular investment, security, transaction or investment strategy is suitable for any specific person.
